Photo Tips: Pros Don’t Use Program Mode

Exposure Compensation might’ve helped in this situation, but even turned up all the way I think it still would’ve given me an image where the rider was too dark.
I should also say something about the Metering Mode, which determines how much of the view finder area the camera uses to determine its exposure settings. Default is usually one that looks at the entire scene and tries to balance the settings to give an overall exposure. This is rarely what you want, in my experience, unless you’re shooting a wide landscape shot.
If you’re shooting a specific subject, such as a person or a motorcycle, you’re better off using the Center-weighted or Spot metering modes. Spot metering looks only at a small area around your focus point, while Center-weighted looks at a larger area around the focus point that is still much smaller than the entire scene. I use Spot metering almost exclusively, figuring that my images always have a specific subject and that subject is the thing I want the exposure calculations based on.

Notice that the rider’s face is exposed properly with good detail, while the sky in the background is much brighter than it would look to a human eye. I have used Spot metering to tell the camera to base its exposure calculations on the area right around the rider’s face rather than to consider how bright the sky is.
Center Weighted may also have done well in this situation, but Average or Matrix metering, both of which consider the entire viewfinder’s area, would have averaged everything out, factored in all those bright sky pixels in the background, and returned an image where the rider’s face was much too dark.
Back to shooting modes
There are situations when I don’t use Manual. But I never resort to Program!
When I don’t have the option to monitor manual settings closely, such as when my subject is moving through light that changes drastically, I use either Aperture or Shutter priority, depending on which is more important for the type of image I want. For control over depth of field I use Aperture Priority, and for control over the amount of motion blur (none, a bit, or lots) I use Shutter Priority.
For example, when I’m in pit lane and photographing the riders as they move between the inside of the box and pit lane on a sunny day, I’ll often switch to Shutter Priority mode to control the motion blur in my image as the main creative element.
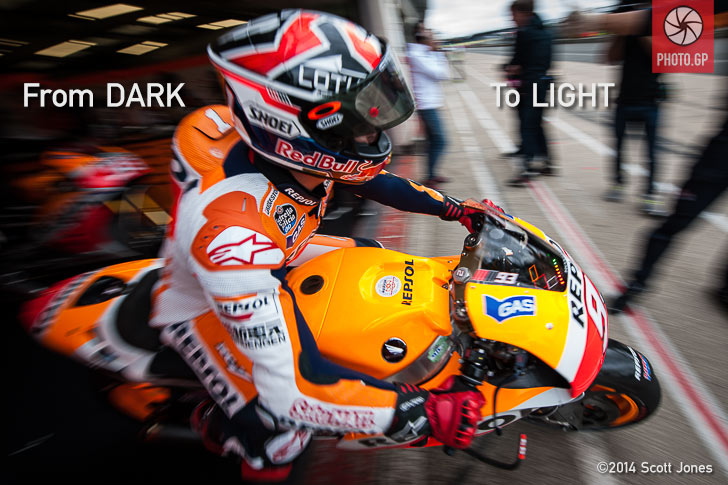 Consider this image of Marquez riding out of a dark Repsol Honda garage into the daylight of pit lane. Because I wanted a lot of motion blur in this situation, I was using Shutter Priority at 1/60, but to give myself some leeway in terms of tracking a moving object from a few feet away, I switched to Center-weighted metering:
This type of image would have been VERY difficult to accomplish in Manual unless I had been willing to sacrifice images inside the garage and images outside in full daylight, determined my settings before hand, then taken one shot at this image as the subject passed into the area I’d exposed for.
Since I wanted to track his movement and at least have a chance of good exposure as he moved from dark to light, I abandoned Manual mode and let the camera do some of the exposure calculation work for me.
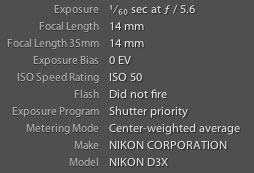
But I may shoot a similar situation of a rider moving between dark and light areas and, instead of wanting an image with lots of blur to show the movement of the bike and rider, I may want shallow depth of field. Then I’d switch to Aperture priority with a large f-stop to make sure that the depth of field emphasized my subject against a background composed of a blur, as opposed to motion blur:
With my Nikon 70-200mm f/2.8 mounted on a Nikon D4, Aperture Priority at f/2.8 and ISO 640 (to allow for shooting inside the box and outside without changing ISO on the fly) figured a shutter speed of 1/800, which was fine for a portrait because there are no spinning wheels to portray movement.
With the first example I choose shutter speed as the defining element of exposure and then concentrated on aiming the camera at the subject and let the software adjust the aperture as the subject moved into brighter light. With the second I chose aperture as the defining element to isolate the subject’s eyes for the portrait with a nice bokeh in the background.
Know what you want
In summary, decide what type of image you want to create, consider the situation, and then select the shooting mode that will help you achieve your goal. When I’m working with a camera I’m always making such decisions, and for better or worse those decisions account for much of what makes my images look as they do.
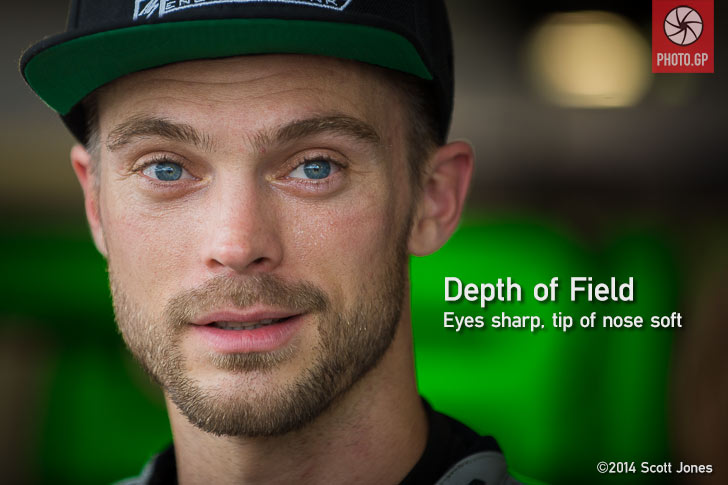
Putting the lead riders into sharp focus in the image below was a conscious choice I made in order to tell the story I wanted to tell:
In this crazy race, Hector Barbera led into the first corner! Another photographer might’ve chosen to tell the story of the riders starting from pit lane, and either focussed on them with a wide aperture to blur the front of the pack, or chosen a small aperture to put as many bikes in focus as possible. (Technically speaking, this would’ve been challenging given the low light at this moment on a rainy day in Spain.) But given the possibilities, this was the image I wanted because it communicated what I wanted to show about this moment – Hector Barbara (of all people) leads a MotoGP race!!! I then selected the camera settings required to get that image.
In summary, escaping Program mode is much more likely to improve your images than hurt them, at least once you get the hang of doing some of the ‘work’ yourself. Forcing yourself to take control of the settings helps you define your desired image and thus increases your chances of hitting that target. Then you can create the image that tells the story YOU want to tell, rather than the one Program Mode serves up by guessing what you want.
![]()
 To see more Motorsports Photography Tips, check out this page!


Please sign in or register to contribute a comment or question.