Use the Histogram to Adjust Image Brightness

I used the histogram in Adobe Lightroom to make sure the image above wasn’t too dark. Please click on it to see a larger version that has been brightened until the pixel values look as desired on the histogram in Lightroom’s Develop module.
When looking at the darker version in Lightroom, the histogram looks like this:

I have added the histogram to the left side so you can see it more clearly. In fact I have adjusted the brightness slightly to darken the image from its original exposure to make the difference more noticeable. The histogram shows that the pixels are stacked against the left side of the graph, and thus the image is underexposed.
If I were looking at this image on an overly bright monitor, it might look fine. But the info shown via the histogram reveals that this is a dark image, and one that will likely not look as desired when it reaches the many other viewing screens out in the world.
There are several ways to change the values shown in the histogram, but the simplest (here in Lightroom) is to increase the Exposure slider. Moving this control from left to right brightens the image, and in real time the histogram values reflect this change.
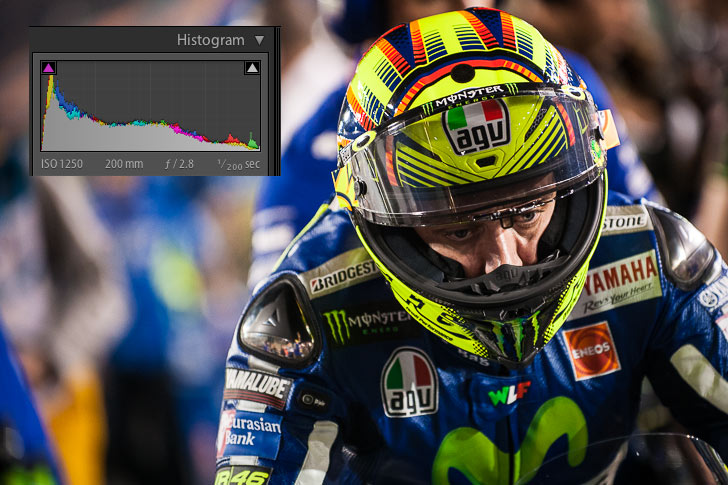
Comparing the histogram values in the two versions of the same image we can see that the brighter image shows more pixels have moved toward the right side of the graph. As this is a night-time image, it’s darker than it would be if taken in daylight, so the fact there the majority of pixels in the histogram are still landing to the left is ok. The main thing is that as a group, there are more pixels over to the right, which means that regardless of how the image looks here on my screen, it will probably look pretty close to what I want on a wide variety of devices.
The histogram is useful for many things, the ability to help you adjust image brightness for screen viewing being only one. This is also my main tool for adjusting images before they go to the lab for printing. My system here at my desk is dark, but that’s how I like to work. Before sending any print out to the lab, I check the histogram to make sure I have pixels where I want them. This nearly always involves brighting the image, which would otherwise come back too dark.
Whichever adjustments you prefer (Levels, Curves, Exposure, etc), remember to check the histogram before saving you image to display. Even if the adjusted image looks bright on your screen, it has the best chance possible of looking good on the Internet.

For more motor sports photography tips, click here.
Photograph: ©2015 by Scott Jones / PHOTO.GP – All Rights Reserved
Camera Info: Nikon D4 with Nikon 70-200mm f/2.8


Please sign in or register to contribute a comment or question.